Athens, then and now

I’m kickstarting a new project.

Well, not entirely new… I took most of the pictures for this project in 2012, but I only started putting the processed work up on a website now.

The project pairs pictures of Athens that my grandfather took in the ’30s, with pictures I have taken from the same position, as much as possible, recently.

Please visit the website (click below) and have a look. There’s a fair amount of processing going into each picture pair, so it will take me a while, but if you subscribe to that blog, you will get updates when new pictures go up.

Posted in Uncategorized | Leave a comment

A picture – A 36 year old love affair

APOY-George Parapadakis I love this picture. I took this picture in 1979, wandering around the Greek flea market (Monastiraki). There is something about the composition that makes it one of my favourites.

I was 15 at the time, and getting stuck into photography for the first time: A relatively cheap camera (A Russian plastic Lomo Smena, with a sweet “triotar” 3-element lens), cheap film loaded from bulk (Kodak Plus-X), and darkroom chemicals made from basic ingredients, to recipes lifted from focal books.

I don’t quite remember the circumstances of shooting the picture, but I remember that it was very dim and I know that I under-exposed it as well.

When I first developed the film, this was just a faint negative. I almost dismissed it, but something about the light and the composition caught my eye. I tried printing it but it just didn’t have enough contrast to be useful. I had read about a particular chemical called Chromium Intensifier, which was used to enhance contrast on film, post-development. If memory serves me right, it’s a simple but dreadfully staining orange formula made from Potassium Dichromate and pure hydrochloric acid (not stuff that most 15-year olds should be playing with…). Nevertheless, I managed to get hold of the ingredients and made a batch which did the trick. I now had a working negative. Not brilliant, but working. APOY-George Parapadakis-2

After a few small test prints and some trial dodging and burning, I managed to get an OK print. By this time, I had fallen in love with the picture and wanted desperately to print it well. I could see in my head what it could be, but my printing skills were nowhere near good enough for it. The dark face, the shiny bald patch and the overall lack of contrast made life very difficult. I eventually made print a 30×40 print (which I still have) and it is still a lovely picture but, frankly, it was technically quite disappointing.


When I started working with digital photography in 2005, one of the first pictures I went back to digitise was this one. I didn’t have a film scanner at the time, so I just scanned one of the original print copies I had and started processing it. Using PaintShop Pro at the time, I could certainly increase the contrast and do some crude dodging and burning. It was definitely an improvement from the gray-ish print I had made in the darkroom, but it now looked grotesquely over processed.

Over the next few years, I made several more attempts at it, as I learned better post-processing techniques and eventually started again with a scan of the original negative. Every time the results got a bit better and every time I was a bit happier, but I still couldn’t get to the picture I had hoped for, the first time I saw the negative.

RBI first published a version of the picture on RedBubble in 2009. It was better than the printed version, and became quite successful in comments and challenges that I posted it into, but looking back at it now, it just seems hideous – the head is glowing with blown highlights, the face still too dark, and the grain is just horrendous. It’s OK when seen small on a screen, but as soon as you look a bit closer it just looks over-processed.

Browsing through my files today, I see that I’ve had at least another three attempts at getting it right, at various times since then.

Today, I decided to have another go at it. I went back to the original film scan again and, using Lightroom 5 this time, I started the processing from the beginning. Lightroom’s tools for controlling highlights, Adjustment brush, Radial filter and overall tone adjustments, allowed me in about an hour, to get closer to my ideal outcome than I have managed to get in the last 36 years. It’s not perfect yet, and I’m sure I’ll get back to it at some point in the future. But for the moment, I’m still as excited by it as I was when I first saw the original negative all those years ago.

APOY-George Parapadakis-3

Posted in Uncategorized | 1 Comment

Shoesonality is back!

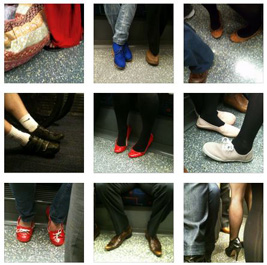
I finally found some time to recreate the mini-site I had on Zapd (now defunct). Shoesonality is a blend of Shoes and Personality – What do shoes and feet posture say about people? It’s all entirely speculative, of course, but it’s good fun and kills time while travelling on the London Underground.

Anyway, go have a browse and “Like” it, if you do! I’d love to hear some feedback.

Shoesonality

Posted in Uncategorized | Leave a comment

How To fix Infrared Hotspots using Adobe Lightroom

Infrared hotspots are a known problem with converted cameras. Some lenses are more prone to it than others (See a relevant discussion here, and a list of lenses with their relative performance here). Certainly in smaller converted cameras, it’s a persistent problem when the light hits the lens at certain angles, and mostly when used on its widest setting.

Sometimes, the hotspot effect is not obvious, until you try and convert the IR shot to a faux-colour one, by swapping channels (here I’m using the Khromagery Faux-Colour actions in Photoshop 5 – the link to the file seems to be broken, but the site is still on)

Here is the original unprocessed shot…

P1030033-1s

… the hotspot is not too distracting, but look what happens after swapping channels. The hotspot becomes a lot more obvious:

P1030033-Edit-2-1s

Hotspots however are quite easy to fix, if you are using Adobe Lightroom 5 and above.

On the Development panel, select the Radial Filter tool (5-th, just before the adjustment brush), and make a selection around the hotspot area. Be generous on your selection as the hotspot usually goes further than you can see.

HotSpot-1

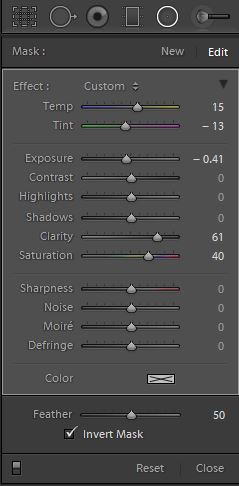
Radial AdjustmentsOn the Radial Filter settings panel, make sure that you tick the Invert Mask box, so that you are processing the area inside the selection, rather than outside.

There are three main adjustments you need to make on that panel. The exact settings will vary depending on your picture and the strength of the hotspot, but the basics remain the same:

Exposure: Reduce the Exposure until the density of the area seems consistenet with the rest of the picture

Clarity: Increase Clarity to remove the “haze” that the hotspot creates, and if you need to adjust the Saturation to match the colour contrast of the rest of the picture.

White Balance: Hotspots tend to create a blue-ish tint to the area. A very slight Temp adjustment towards the yellow and a slight Tint adjustment towards the green, seems to correct that.

Now start from the top and fine tune again. Experiment. Sometimes increasing the contrast may also help balancing out the hotspot.

This is the same shot, with the hotspot recovered using the settings above:

P1030033-1s-2

The same Khromagery conversion now. produces a much more acceptable file:

P1030033-Edit-3-1s

A side-by-side comparison shows the difference more clearly:

P1030033-1sP1030033-1s-2

P1030033-Edit-2-1sP1030033-Edit-3-1s

Please leave me a comment and let me know if this technique works for you, or if you have any suggestions for improvements.

Posted in Infrared - IR, Infrared - IR | 9 Comments

Lifting the fog

I read somewhere that Infrared film was used in WW2, and later, for aerial and reconnaissance photography. A recent experiment I did, shows clearly why:

SONY DSC

These two shots are taken at the same time from the same spot using the same lens. One is with a normal DSLR camers, the other with an IR converted one (780nm filter).

As you can see the difference in detail is quite dramatic. Infrared light penetrates much better though fog and mist and allows a lot more contour detail to be captured.

Posted in Experiments, Infrared - IR | Tagged , , , , | Leave a comment

Time to catch up…

It’s been a long time since I updated my photography blog, so it’s time to catch up. Looking back, the last couple of years have not been as prolific as 2010-11, not in terms of volume anyway. After 2011, I took a step back from RedBubble (for reasons that I won’t get into here), so the constant drive to produce and post pictures went away. That doesn’t mean I have stopped taking pictures, just that I focused more on a number of specific projects rather than photographing anything and everything around me.

2012

2012 was the year of “The ‘Clips”. With some friends, we launched a facebook project, where each of us chose an object of choice, and committed to produce a different picture of it for each of the 52 weeks of the year. My object of choice was paperclips, but I decided not to just take pictures of paperclips, but to create little stories, where the paperclips would get a human personality and be the protagonists. Looking back, this was a hard project! Not only did I have to come up with a new creative idea every week, but I also had to figure out ways of making macro photography look realistic. I tried to stay away from photoshop as much as possible, but in the end that proved impossible to do. I have to say, even if I never managed to do all 52 pictures (yet!), I see this as the most significant and coherent body of work I’ve done so far. I’m quite proud of my little ‘Clips family and their antics… 🙂

1/52 - The 'Clips at Christmas 2/52 - After Christmas the 'clips are back at school 3/52 - Mrs 'Clips found an old photo of uncle Joe... 4/52 - Colonel 'Clips was a hero! 5/52 - Illyanna 'Clipskaya 6/52 - She was the most beautiful 'Clip he had ever seen... 7/52 - The weather, was not helping her mood... 8/52 - "Ten years to think about it", Judge 'Clips said... 9/52 - New York, 1963 10/52 - David "The Clip" Ickx 11/52 - 200m Freestyle - 12/52 - So tragic :-( 13/52 - Good Friday - The 'Clips went to to church 14/52 - Le Penseur / The thinker 15/52 - 'Cevin decided to take the Old Girl out for a spin... 16/52 - Everyone froze! He was the last person they expected to 17/52 - Help! Help! 18/52 - Mr. 'Clips took the twins to the zoo 19/52 - Airborne! 20/52 - "Kumbaya, my Lord, Kumbaya" 21/52 - Jack 'Clips and the giant beanstalk 22-52 - Tracing the 'Clips ancestry... 23/52 - Sky diving over the rapids 24/52 - Pre-historic 'Clip discovered! 25/52 - Together forever... 26/52 - The 'Clips Gallery 27/52 - All-Blacks vs. All-Whites: Scrum 28/52 - Having a great time here, missing you all! The 'Clips xx SONY DSC 30/52 - Magritte was right on so many levels... 31/52 - Clippette was so proud of her little girl 32/52 - Johnny loved the giant telescope! 33/52 - Bob tired to blend in, but people still stared... 34/52 - Lady Headington-Clips 35/52 - Another delayed flight... 36/52 - So proud! 37/52 - Clip Pride! 38/52 - Berlin, 1946 39/52 - The trip to Scotland had a few surprises... 40/52 - Spare some change please? 41-42-43/52 - All the clips dressed up for the beach party! 44/52 - "Step in time, Step in time" 45/52 - Sneak peek at the 'Clips Christmas

2013

In 2103, with the same group of friends, more or less, we launched a different project still based on the commitment of one picture per week. However, this time we all had to take pictures on the same theme and there would be four themes throughout the year. We called the project “4 seasons”:

First season was “Leading lines“. Not too difficult, since leading lines and perspective is all around us, but keeping it interesting and different every week was still a challenge.

01- 2/52 - Into a spin... (macro) 3/52 - St. Paul's (Night, Architecture) 4/52 - Winterland (rural) 5/52 - Trodden (rural) 6 -52 "More London"

7/52 - Palacio Real, Pl. de Oriente, Madrid, Spain 8/52 - Going for Gold 9/52 - Gandhi 10/52 - Euston Square, 5pm 11/52 - University College Hospital, London 12/52 - Morning dew 13/52 - Swing man

Second season was “In the style of… or Inspired by..“. This was more interesting, more difficult and more rewarding. The quest to find famous photographers or iconic shots to replicate or pay tribute to, led to a lot of research and even more appreciation of how difficult some of these shots were to replicate (if not impossible!) and the effort, composition and lighting skills that went into those originals.

14/52 - Willen Puddle 15/52-Savoy SONY DSC 04- SONY DSC The Nutcracker Suit(e) SONY DSC SONY DSC SONY DSC SONY DSC SONY DSC SONY DSC SONY DSC

Third season was “Miksang” also known as “Contemplative Photography”. I had never previously come across Miksang, so the trickiest part from me was to understand what made a picture, a Miksang picture. The rules are not precise, and the philosophy is more about the mindset of the photographer at the time that the picture was taken, and less about the end result. Nevertheless, we had a go at that too, with some interesting examples. Interestingly, most of us found it very challenging to get out of the Miksang frame of mind when moving on to the same thing. Miksang-style shots kept reappearing during the rest of the project.

SONY DSC 09- 08- SONY DSC SONY DSC SONY DSC SONY DSC 03- SONY DSC 13- SONY DSC SONY DSC 10-

Fourth and final series was “Black and White, contrast and textures“. It sounded simple enough (especially if you have done b&w photography before) but in the process I discovered two interesting snags: (1) This series coincided with Autumn in England. This means no sun, and plenty of clouds and rain – not the ideal light for high contrast pictures! (2) It has been a while since I’ve done any serious b&w, and I needed to find my “seeing in B&W” mojo again.

01- SONY DSC SONY DSC SONY DSC SONY DSC 08- 07- 06- SONY DSC SONY DSC 03- 02-

Outside these intense projects, holidays were still the main source for other photography, but they have only yielded relatively few noteworthy shots in the last couple of years.

2014

This year, I’m changing gears: I have joined The Royal Photographic Society, and will be spending time to (a) get to know and network with some of the other photographers in the UK scene and (b) try to get the first two levels of accreditation by the society: LRPS and ARPS. So watch this space…

Posted in Uncategorized | Tagged , , , , | Leave a comment

Is it Art, is it Science or is it the Art of Science?

I don’t often cross-post between my ECM and my Photography blogs, but this is definitely a post that is relevant to both…

I was having one of these left-brain vs. right-brain discussions with a friend of mine who works in IT and also happens to be a keen photographer, as I am. He asked me: “Do you consider yourself primarily a technologist or an artist?”

I could not answer the question. The obvious answer is “both”, but the more I think about it, the less sense the question makes. Is there really a distinction between these two? I don’t believe so. They are certainly not mutually exclusive.

Let’s look at an example of a software developer and a painter or a photographer or a writer: They all have to start with a vision, they all have to innovate and all have to be problem solvers. Just imagine yourself in an artist’s studio, a photographer’s studio or your IDE environment, and look at each process:

In painting, you chose your canvas, depending on the final purpose of the painting. In photography your format and your output medium, based on the audience. In software you chose the operating system and the market your solution is intended for.

Then you choose your primary crafting tool: Your paintbrushes or your pencils, your cameras and lenses or your coding language. And you start the creative process. Your lines of code are your brushstrokes, the same lights and shadows and colours make up your composition.

In art you use a palette of colours and you combine them to create new ones. In photography you have exposure techniques and filters and in coding you use code libraries.

You step back, you look at your masterpiece or test your code, and then you use turpentine, an eraser, debugging tools or Photoshop to correct minor mistakes.

I believe that not only software development, but most scientific undertakings are a form of art. If you are experimenting in a chemistry lab, or you are designing a marketing campaign, or designing a new electronic device, you will have to use tools and imagination to create something new. You will use subjective judgements to determine if it’s bad or if it’s good. And once you deliver it you will be critiqued by other people.

So, as a solutions architect, I use artistic processes to bring my visions to life. As a photographer, I use both technology and science to create new art. Can I ever de-couple art from science? No. If I did I would end up being bad at both.

Posted in Art, Experience, Opinion, Personal Blog | Leave a comment

“Project 1/52”

I have just started working on a very exciting and rather ambitious project: I am going to be photographing paperclips for the next 52 weeks! 🙂

OK, it’s not quite as strange as it sounds… Together with a few photographer friends, we launched a group project on facebook, which will run for 52 weeks. Each of us had to pick a specific theme, based on a household object, and then each week we submit a new photograph based on our theme. My theme is anthropomorphic paperclips: “The life and times of the ‘Clips family”.

I don’t know if I will have the tenacity or enough ideas to keep this going for 52 weeks, but I’m willing to try. I love the surreal element of my theme, and that I can create an infinite number of micro-scenarios and situations that the clips find themselves in. My challenge is to make the characters believable, to make the photography look good, and to not run out of ideas. Not too different from writing stories I guess, but with the added twist of having to condense each story to a single snapshot.

Rather than cluttering this blog with the details of the project, I’ve set up a new blog. If you are interested please have a look and follow me there too: http://52clips.wordpress.com

It’s been a long time since I got this excited about a new project! 🙂

Posted in Uncategorized | Leave a comment

Sigma 17-70 HSM OS + Sony Alpha a580 SteadyShot – A conflict of interest

A conflict of interest...

I have always been fond of the in-camera stabilisation introduced by Minolta and then adopted by Sony and licensed to other manufacturers. On my a350 it was more or less permanently switched on and I generally forgot all about it, whatever lens I happen to put on the camera. It worked well, allowing me to take handheld shots with anything down to 1/10sec.

After my kit was stolen and I looked to replace my “walkabout lens” which was the Sigma 17-70, I realised that the newer model came with two main changes: HSM (Hyper-Sonic Motor, i.e. autofocus motor inside the lens, rather than driven from the camera) and OS (Optical Stabilisation, i.e. stabilisation inside the lens).

HSM has an obvious advantage as it’s quieter and quicker. The older 17-70 was OK in terms of focusing speeds, but nothing to write home about. The new lens is definitely faster and it seems to be hunting less. I’m not sure how it compares on battery consumption, compared to the in-camera motor, but I’m assuming that it should be more economical, as it involves a lot less physical movement and smaller motors. The price you pay of course is that it makes the lens heavier.

OS is less of an obvious story… I quite like the idea on having stabilisation in the lens, as a long lens tends to shake more than the camera body in my hands and in particular at axes that the in-camera stabilisation cannot correct. Lens OS is also visible in the viewfinder so you can actually see that it works and what effect it has.  Sony however already has stabilisation in the body, so where do these two systems sit against each other? Well, a quick hunt on Google and YouTube proved what I was fearing… they do not complement each other. In fact, they totally conflict with each other, making the situation much worse. And from the same tests, it’s clear that in-lens OS has a marginal edge over in-camera stabilisation. So, all things being equal, I should use the in-lens OS.

All things are not equal though. When using the OS on the lens, you have to switch off SteadyShot in the camera. This is a pain! The OS on/off switch on the lens is simple enough. But the a580 (unlike the a350 I had before) does not have a physical button for switching SteadyShot on and off. You need to go the on-screen menu, navigate to the relevant option and switch it on or off. Not only it’s time consuming, but there is also no way of easily spotting that it’s on or off. There is an indicator in the corner of the viewfinder that tells you that camera stabilisation is off, but it’s not obvious when you are concentrating on shooting.

Add on top of that, the aggravation of constantly switching between the two systems when changing lenses (since the 17-70 is my only lens with OS), which I do frequently, and you can see how this becomes impractical. Finally, when shooting on a tripod, you need to remember to switch both off, and to switch one of them back on when you take the camera off the tripod.

While trying it out in the field, I often found myself with either both systems off (not great) or both systems on (absolutely bad idea).

I am aware that I sound like a spoilt brat, moaning, when I have the luxury of two great stabilisation systems to choose from. But what I’m really moaning about is a bad design decision. It’s pretty obvious to me and should also be to Sony engineers, that independent lens manufacturers will not continue to support two manufacturing lines for each lens, one without OS for Sony Alphas and Pentaxes and a separate one with OS for all other cameras. It’s not economically viable. And as OS is becoming more common in the less expensive lens ranges, a mixture of OS and non-OS lenses for the Sony mount was inevitable. And even if it wasn’t obvious, I’m sure that the Sony and Sigma engineers talk to each other! So, deciding to move the SteadyShot switching from a physical switch (as it has been since SteadyShot was introduced on the early digital Minoltas) to a menu option was a BAD design idea! I know it saves money in components and also reduces body size, but at the higher end of the consumer market where the a580 sits, that should not be a primary design driver against usability.

An even better idea would be (and one I’m sure can be introduced through a firmware upgrade) for the camera and automatically switch off the in-camera stabilisation when an OS lens is attached. Even if it’s not possible to detect if the OS in the lens is actually switched on or off (although I don’t see why not…), it could easily be a settings option to disable the in-camera stabilisation when a lens with OS is attached to the camera and then automatically switch it back on when a non-OS lens is attached.

After all, that’s exactly how the camera behaves for HSM focusing.

They say that “you can have too much of a good thing”. Well, this is definitely the case here!

Posted in Equipment Review | Tagged , , , , , , , , , | Leave a comment

The recovery begins…

Glencoe, Scotland

Driving out of Glencoe… © George Parapadakis

(Geek alert: There will be camera gear discussions here… )

So, it’s true… You pick yourself up, you dust yourself off and you move on.

After that incident, I went a bit cold on photography, in general. Even though most of the holiday shots were safe on my backup drive, I looked at them a few times and did not feel inspired to do much with them… A lull.

Two months later, things are slowly getting back to normal. Acquiring a new work laptop was sorted relatively easily, but restoring it to full working order from the backups, took a couple of weeks. In contrast to that, I bought a second hand iPhone and was grateful to Apple (I’d never thought I’d say that…) for their almost one-button restore process.

The cover for personal items on the travel insurance was laughable, not even worth filling the endless forms they were asking for, but the House Contents insurance gave me a neat cheque to start rebuilding. Not the full amount that I will need to replace everything, but certainly the full amount that the policy allowed for. And they did so with very little hassle. Thank you Nationwide!

So, with basic connectivity sorted out, first stop was buying a portable camera: I used to carry around a Casio Exilim SX10 with me all the time, which was tiny and has given me some excellent pictures, but I wanted something better with more manual control and something I can travel with. Whenever I’m on a business trip, I always try and spend some photography time if I can. That usually meant carrying my DSLR kit everywhere. This time I opted for a Lumix LX-5, which is portable enough to be permanently in my bag, but also serious enough to be able to do some decent photography while travelling. That’s the theory at least. At a price that is more expensive than an entry DSLR and almost three times the price of the Casio, it better be!!! 🙂

Then came the question of replacing the DSLR: Since I lost most of the lenses with the camera, I considered the option of changing system altogether, moving from Sony to Nikon. But I decided that I still have enough other accessories, flashes, adaptors, lenses, etc. that would be wasted if I didn’t get another Sony. And I’ve always been a Minolta fan, so there is an element of brand loyalty involved.

But, which one? My stolen one was a a350, which was a great camera, but it had serious limitations when it came to low-light photography. Newer Sony generations have a much better processor for reducing noise on high-ISO settings. They are still lagging behind Canon and Nikon in that respect, but at least speeds up to 6400 are now usable. I considered briefly the a390 which was a very small step up from the a350, and I really did not like the look and feel of it anyway. I knew that if I bought that I would be looking for upgrading it soon. So next in the list was the a580 or the new a55.

These cameras are basically offering the same features, apart from the fact that the a55 uses the new translucent mirror technology. I had a quick look at the a55 at Jessop’s and two things struck me: (1) the body is tiny. It looked like a hybrid/bridge camera and it didn’t sit well in my hand. I can imagine it with a bigger and heavier lens like the Sigma 17-70 or 10-20 on it, it will also be out of balance. (2) I found the electronic viewfinder experience quite odd and I wasn’t prepared to waste some of the low-light capabilities of the sensor, to the translucent mirror (at least a 1/3 of a stop). I also did not need the extra shooting speed that it offers (10 f/m). So I decided to go for the a580 instead which is a tad on the larger and heavier side (compared with the a350 that I was used to), but sits well in my hands.

In the meantime, I was also considering what to do about lenses. The four I lost were Sigmas (17-70, 10-20 and 105 micro) and an older Minolta 70-300. I looked hard at alternatives, but I decided that, without forking out grand amounts of money for Carl Zeiss lenses, the best quality and flexibility at an affordable price were exactly the lenses I lost. So I’ve ordered a new 10-20mm, I managed to find a second hand 105mm and I also ordered the new 17-70mm, which now comes with Optical Stabilisation built in. (I’ll write a separate blog on the a580 with the new 17-70). I’m still on the lookout for a good second-hand 70-300, although I still have my trusted Minolta 70-210 (beercan) to keep me going.

Next on the list was an infrared camera. In the past, I played around with IR filters on DSLRs, which are very limiting, and eventually bought a second-hand Minolta 5D which I converted to a proper full-time Infrared DSLR by removing the built in “hot filter” that completely cuts out IR, replacing it with a 720nm IR filter. The operation was successful and the end result was a great DSLR that would take all of my lenses and would shoot IR at normal camera speeds. It was great fun and I’m really sorry it’s gone.

So I started looking at ebay for a replacement one, planning to repeat the conversion exercise. However two things were bugging me: The IR conversion is not simple. It’s a complex, delicate and super-clean operation as it involved taking the camera completely apart, down to the unprotected sensor. It’s a project that you have to start and finish more or less in one go, you cannot do it in stages. Last time, it took me months to find the right, uninterrupted, time to start the project, with space to work and without kids and dogs running in and out. The other thing that was bugging me was bulk. Much as I enjoyed the fact that I could use all my lenses on it, carrying around a second DSLR body just for the odd occasion that an IR opportunity may come along, was rather annoying and heavy.

While browsing eBay I came across a couple of refurbished, IR converted compact cameras on sale in the US. The price tag was about the same as a second hand body plus an IR filter would have cost me, and all the hard work converting them (and testing them) had already been done. So I’ve decided to try one of them out (another Lumix, as it happens). The disadvantage of course is that I can’t use my normal lenses, but it has a decent zoom, and the advantage is that I can easily carry an IR camera around with me wherever I go. I’m still waiting for the camera to be delivered, so more impressions when I get hold of it.

So with that, with the odd polariser filter still missing, I’m more or less back where I was. I won’t be replacing my iPod (didn’t use it much) and I won’t be replacing my Zoom SLR Gorilla pod (I’ll buy a decent travelling tripod instead).

Last weekend, some of the kit got its first outing: A trip to Scotland – Even though the Lumix LX5 is a great little camera and has no problem taking decent pictures, it was a great relief to have a proper DSLR camera in my hands again. I know it sounds snobbish and geeky, and I know that the kit does not make the pictures, but it felt right in my hands and I got inspired again to do some proper photography again after a few months drought…

Posted in Experience, Personal Blog | Tagged , , , , | 2 Comments